How to create CD graphics in InDesign
1. Download and open the template
First find and download the template you need from our website. We’re going to be using the Standard Digipack for this tutorial.
Double-clicking on the .zip will open the file and give you multiple options. In InDesign go to File > Open... and navigate to where on your computer the downloaded template file is. Select the .indd file

The layers are as follows:
- HEADER: This displays the the information at the top of the template.
- DELETE THIS LAYER: This displays the template lines. Do NOT edit the template layer.
- ARTWORK: This layer displays your artwork. You may begin building graphics on this layer.
 The eye icons on each layer indicate which layers are visible or turned off. For example, in this picture the DELETE THIS LAYER layer is off, and the HEADER and Layer 1 layer is visible. This is important later!
Yay! Template!

There are a couple of things to keep in mind before you start building your graphics.
- Your files should be built in CMYK. You can check this by going to the Edit > Transparency Blend Space > and selecting Document CMYK.
- Some templates require panels to be upside down or rotated. The orientation of the text on your template is a clue to how your images should be laid out.
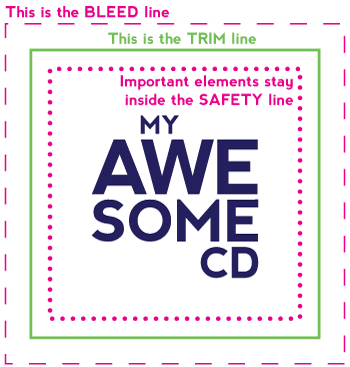
There are several colored lines on the template.
- The pink dashed line is BLEED. All graphics need to go to this line to make sure we get full coverage when we print.
- The solid green line is the TRIM line. Anything outside of this line will get trimmed off in assembly.
- The dotted pink line is the SAFETY line. Make sure all of your text or important elements stay INSIDE this line.
2. Start building your graphics
You can either place graphics you’ve already created directly into the template or build them from scratch. To place a file, go to File > Place… Then select the file you want to add.

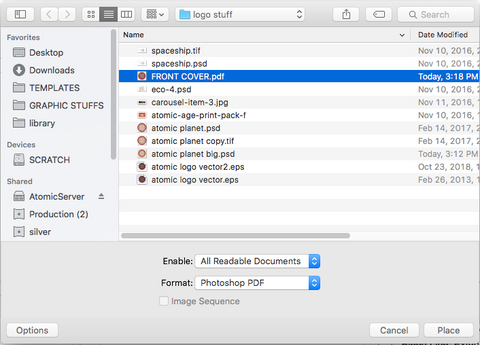
Something unique about InDesign is it’s image cropping. If you place an image it will automatically show the full image. If you try to scale the image, you will only scale its containing box! To scale your entire image, make sure you select the image itself by clicking on the semi-transparent circle in the center if the image first.
 This containing box has been scaled, but not the image itself. Click on the center circle to scale the actual image.
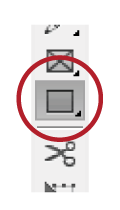 You can use the Rectangle tool or other Shapes tools to create shapes of colors or boxes for images.

You can use the Selection tool to move things around. Make sure you pay attention to where each panel meets another.

Now that all your images are placed where you want them, you can start adding text.
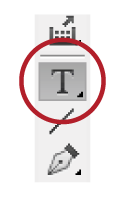 Select the Type tool from the Toolbar, then click and drag to create a text box. You can also just click if you want to add a single line of text. Add your band name, song titles, credits, whatever you want to say.

InDesign’s Color Palette is a little different from other software. Selecting the small T symbol will change the color of text selected. Selecting the small square will edit the color of shapes selected

If you would like a barcode you can either specify a space, or our designers will find a good spot for it. The minimum size for a barcode is 1.2” wide x .45” tall.
3. Save your file
Remember to SAVE YOUR FILE as you go, in case your computer crashes.
We recommend saving two copies. One that saves all the layers (just in case you have to go back and change something) and a second flattened version that you send to us for printing.
To save a layered file:
Go to File > Save As... Name your file, and select where you want to save it. Click Save and that’s it!


Before you can save your final files, you need to outline your text to ensure it will print correctly. You can do this by selecting all of your text and go to Type > Create Outlines.
PLEASE NOTE once this is done you cannot edit your text. Make sure you have two separately saved versions of your file.

Save your file for printing:
- First completely delete the template layer by selecting it and clicking on the garbage can icon in the bottom of the Layers palette. If you leave it on, all those colored lines and text will be printed over your artwork!
- Go to File > Export...
- Select Adobe PDF (Print).
- Click Save to save your flattened file.

The Settings should be as follows:
- Select Adobe PDF Preset '[PDF/X-4:2008]'
- Select Standard 'PDF/X-4:2010'
- Select Compatibility 'Acrobat 7 (PDF 1.6)'

4. Upload your files
That’s it! You’ve created your graphics! Now you are ready to upload them to our website using the upload link provided in your order confirmation email.
If you have any further questions, you can contact as by emailing production@atomicdisc.com or calling (503) 610-2929.